Introduction
This is the homepage for a short 4-week introduction to using openFrameworks hosted at Goldsmiths, University of London as part of the Masters in Computational Arts program. This site will hold code samples and additional resources for development.
Please make sure you already have a coding environment setup to use openFrameworks v0073: openFrameworks. You will want to get the appropriate version for your operating system (OSX/Windows/Linux). When you download openFrameworks, there is no application included which you run (like Processing). You basically get a zip file with a bunch of code in different directories.
To start programming in openFrameworks, we usually start with a “project file”. In OSX, this is an extension of “.xcodeproj” and for Visual Studio, it is “.prj” (I think). We open this project file using an IDE, an integrated development environment. For OSX, this is XCode, and for Windows, this is Code Blocks or Visual Studio. You can get all of these programs for free as a student (and legally too). The IDE comes with a lot of tools to help us program and has nothing to do with openFrameworks at all. openFrameworks is simply a huge set of libraries that make it easy to code complicated programs quickly. The IDE gives us a lot of features like code completion (automatically guessing what we want to code), compiler (turning our C++ code into assembly/machine code), linker (combining all of our compiled code into an executable program), and debugger (executing a program and being able to look at where the program is in your code at the same time).
Helpful C++ Resources & Books
I often Google search things like how to manipulate strings, vectors, data structures like lists or maps and find resources on stackexchange or stackoverflow. But it is also helpful to have some concrete resources for C++. Here are some that I’ve been recommended before:
C++ Tutorial
Another C++ Tutorial
Bjarne Stroustrup’s The C++ Programming Language
Deitel & Deitel’s C++ How to Program
Also some openFrameworks specific resources:
Jeff Crouse’s Introduction to openFrameworks
openFrameworks Forum (ask questions, find answers to questions already asked)
openFrameworks Documentation
oepnFrameworks addons
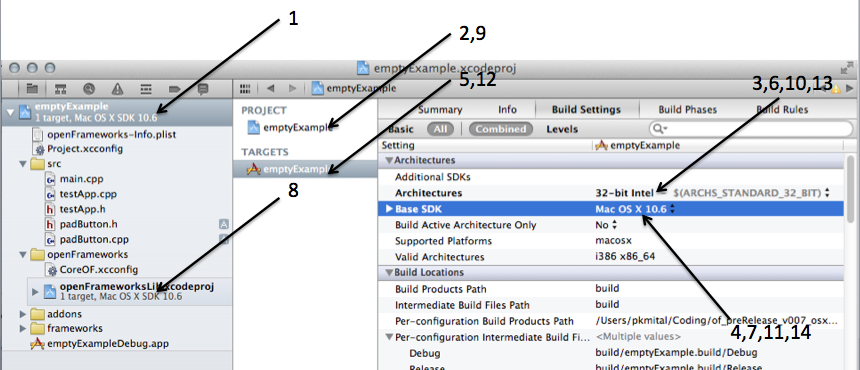
If you are having trouble compiling the OSX-based openFrameworks examples, make sure your project settings are set to use your operating systems SDK. An SDK holds a set of functions and libraries that your program has access to. For OSX, with each new major OS update, there is a new SDK and you sometimes have to tell XCode which SDK to use. The following image shows you how to change both the project and target settings of both your openFrameworks and emptyExample project.
You can also change the name of your application. In order to change your application’s name, you will need to navigate to your Target’s Build Settings. The picture below is meant to help you find the “Product Name” setting. Click on your XCode project, then Target, then Build Setting Tab. Search for “Product Name”, and you can change the value here.

Week 1: XCode, openFrameworks
Introduction
openFrameworks introduction:
– http://www.openframeworks.cc/
– open-source creative coding toolkit for writing software
– provides many high-level classes and abstractions which are cross-platform for a collection of libraries including: OpenCV, Vector/Matrix Math, Graphics using OpenGL, Mesh, OBJ, VBO, Shaders, Audio/Video input/output/saving, Kinect, File/Directory access/manipulation, TCP/IP/UDP/OSC, Threading, Physics engine, Synthesizers, iPhone/Android integration (GPS/Compass/UI/OpenGL/Maps/Audio/Video), …
– project generator (v0072+) gets you started with a new openFrameworks project quickly.
Instructions
First use the project generator to create a new openFrameworks project that we’ll open using XCode. The project generator is an application which creates an XCode project and sets up all the openFrameworks libraries and path settings within the project so we don’t have to. You can find it inside your openFrameworks download inside the directory, “projectGenerator”. Give your sketch any name, and click the “GENERATE” button. We won’t need to use any other features of the project generator at this time.
I’ve included the source code for a few different programs below. To try these, copy and paste the testApp.h and testApp.cpp files below into the testApp.h and testApp.cpp files inside of your newly created XCode project. Try running each of the individual programs one at a time. To get your program running inside of XCode, after you have copied the code so your testApp.h and testApp.cpp files look exactly as below, click the large Play button in XCode. If you have any problems at this point, first make sure the “Scheme” is set to the name of your project, and also have a look at the images above to make sure the SDK has been set (see images above with black arrows indicating where to click!). Have a read through the code line by line, changing anything you wish to play with, and come ready with questions for next week.
basic program:
testApp.h
#pragma once

#include "ofMain.h"

class testApp : public ofBaseApp{

    public:

        // declaration of functions
        void setup();
        void update();
        void draw();
};
testApp.cpp
#include "testApp.h"

// here we "define" the methods we "declared" in the "testApp.h" file

// i get called once
void testApp::setup(){

    // do some initialization

    // set the size of the window
    ofSetWindowShape(250, 250);

    // the rate at which the program runs (FPS)
    ofSetFrameRate(30);

}

// i get called in a loop that runs until the program ends
void testApp::update(){

}

// i also get called in a loop that runs until the program ends
void testApp::draw(){

}
mouse input:
testApp.h
#pragma once

#include "ofMain.h"

class testApp : public ofBaseApp{

    public:

        // declaration of functions
        void setup();
        void update();
        void draw();
};
testApp.cpp
#include "testApp.h"

// here we "define" the methods we "declared" in the "testApp.h" file

// i get called once
void testApp::setup(){

    // do some initialization

    // set the size of the window
    ofSetWindowShape(250, 250);

    // the rate at which the program runs (FPS)
    ofSetFrameRate(30);

    // don't clear the background on each update/draw loop
    // ofSetBackgroundAuto(false);
}

// i get called in a loop that runs until the program ends
void testApp::update(){

}

// i also get called in a loop that runs until the program ends
void testApp::draw(){

    // set the size of the circle
    float radius = 3.0f;

    // draw a circle at the mouse position
    ofCircle(mouseX, mouseY, radius);

    // note:
    // the two variables, mouseX and mouseY are declared
    // in the base (parent) class
}
drawing a line:
testApp.h
#pragma once

#include "ofMain.h"

class testApp : public ofBaseApp{

    public:

        // declaration of functions
        void setup();
        void update();
        void draw();

        int counter;
};
testApp.cpp
#include "testApp.h"

// here we "define" the methods we "declared" in the "testApp.h" file

// i get called once
void testApp::setup(){

    // do some initialization

    // set the size of the window
    ofSetWindowShape(250, 250);

    // the rate at which the program runs (FPS)
    ofSetFrameRate(30);

    // we are going to increment this variable each "frame"
    counter = 0;

}

// i get called in a loop that runs until the program ends
void testApp::update(){

    // update some variables
    counter = counter + 1;
}

// i also get called in a loop that runs until the program ends
void testApp::draw(){
    ofBackground(0);

    float amplitude = 100.0f;

    ofSetColor(100, 100, 100);
    ofLine(0, 125, 250, 125);

    ofSetColor(200, 200, 200);
    for (int i = 1; i < 250; i++) {

        float x1 = (float)i / 250.0;
        float y1 = amplitude * sin( x1 * 2.0*PI );
        float x2 = (float)(i - 1) / 250.0;
        float y2 = amplitude * sin( x2 * 2.0*PI );

        ofLine(x1 * 250.0f, -y1 + 125, x2 * 250.0f, -y2 + 125);
    }
}
audio input:
testApp.h
#pragma once

#include "ofMain.h"

class testApp : public ofBaseApp{

    public:

        // redeclaration of functions (declared in base class)
        void setup();
        void update();
        void draw();

        // redeclaration of two special functions which handle audio i/o (declared in base class)
        void audioRequested(float *buf, int size, int ch);
        void audioReceived(float *buf, int size, int ch);

        // we will keep a pointer to our audio
        float *audioInput;
        int sampleRate, bufferSize;
};
testApp.cpp
#include "testApp.h"

// here we "define" the methods we "declared" in the "testApp.h" file

// i get called once
void testApp::setup(){

    // do some initialization

    // set the size of the window
    ofSetWindowShape(250, 250);

    // the rate at which the program runs (FPS)
    ofSetFrameRate(30);

    // setup the sound
    sampleRate = 44100;
    bufferSize = 250;
    ofSoundStreamSetup(2,               // output channels
                       1,               // input channels
                       sampleRate,      // how many samples (readings) per second
                       bufferSize,      // size of each copy of audio
                       4);              // latency of audio


    // a variable to store our audio
    audioInput = new float[bufferSize];
}

// i get called in a loop that runs until the program ends
void testApp::update(){

}

// i also get called in a loop that runs until the program ends
void testApp::draw(){
    ofBackground(0);

    float amplitude = 100.0f;

    ofSetColor(100, 100, 100);
    ofLine(0, 125, 250, 125);

    ofSetColor(200, 200, 200);
    for (int i = 1; i < 250; i++) {

        float x1 = (float)i / 250.0;
        float y1 = amplitude * audioInput[i];   //amplitude * sin( x1 * 2.0*PI );
        float x2 = (float)(i - 1) / 250.0;
        float y2 = amplitude * audioInput[i-1]; //amplitude * sin( x2 * 2.0*PI );

        ofLine(x1 * 250.0f, -y1 + 125, x2 * 250.0f, -y2 + 125);
    }
}

void testApp::audioRequested(float *buf, int size, int ch)
{

}

void testApp::audioReceived(float *buf, int size, int ch)
{
    // copy the data into our variable, audioInput
    memcpy(audioInput, buf, sizeof(float) * size);
}
camera input:
testApp.h
#pragma once

#include "ofMain.h"

class testApp : public ofBaseApp{

    public:

        // redeclaration of functions (declared in base class)
        void setup();
        void update();
        void draw();

        void keyPressed(int key);

        ofVideoGrabber camera;
};
testApp.cpp
#include "testApp.h"

// here we "define" the methods we "declared" in the "testApp.h" file

// i get called once
void testApp::setup(){

    // do some initialization

    // set the size of the window
    ofSetWindowShape(320, 240);

    // the rate at which the program runs (FPS)
    ofSetFrameRate(30);

    // setup the camera
    camera.initGrabber(320, 240);
}

// i get called in a loop that runs until the program ends
void testApp::update(){
    camera.update();
}

// i also get called in a loop that runs until the program ends
void testApp::draw(){
    ofBackground(0);

    // draw the camera
    camera.draw(0,0);
}

void testApp::keyPressed(int key)
{
    switch (key) {
        case 's':
            camera.videoSettings();
            break;
        default:
            break;
    }
}
Week 2: Introduction to Object Oriented Programming
Introduction
This week we looked at the examples posted last week in more detail and started to try to understand the difference between class “declarations” and “definitions”. We also eventually created an “object” in the last example which allowed us to interface with the ofVideoGrabber class. We called the “methods” (also called “functions”) of this class by simply writing a dot after the object’s name, e.g.: camera.draw(0,0); Many of openFramework’s core functionality can be understood by looking at the header (also called “declaration” files) of different classes, e.g. looking at the video grabber’s header file, ofVideoGrabber.h, we see it has functions for draw, update, videoSettings, etc… Well-written C++ code has self explanatory function names and classes. When we start to become more familiar with coding, we will start to expect certain functions to exist when we use a new class. For instance, if we had a class which allowed us to load an image, we’d also expect that it had a method to draw that image, resize it, mirror it, or access its pixels (see ofImage.h). We will start to look at this in more depth next week when we write our own C++ class. For now, start looking at the openFramework’s examples, and try looking at the header files of any objects created in these examples. Also see where the methods of these objects are declared.
Questions
What is the difference between a method and a function?
They mean the same thing. They are blocks of code that run when you call them. They have a return type and can have parameters. Here is a simple function:
int addTwoNumbers(int firstNumber, int secondNumber)
{
    return firstNumber + secondNumber;
}
The return type is “int“, meaning there is an integer returned. If it were void, we would not have had to return anything. The function also takes two parameters, firstNumber and secondNumber, which have types int and int. We can call this function elsewhere by writing the name of the function and sending it 2 integers like so:
void setup()
{
    int someNumber = 10;
    int x = addTwoNumbers(5, someNumber);
}
The value of x is now 15.
What is a class?
A class contains a set of methods and variables. We can instantiate an object in a very similar way as we do with an int or float, by simply creating a variable, e.g. ofVideoGrabber camera; When we create this object, we can call the public methods that are defined in the class definition. Have a look at the camera example from week 1 for an idea of how this works.
What is the difference between a class definition and a class declaration?
A definition is often contained in the .cpp file, and is the code that is run when a function is called. This is the code that goes between the curly braces after the function’s re-declaration in the .cpp file. A class declaration appears in the .h file, and only provides syntax for what the return type of a function is (e.g.: void, int, float, string, etc…), and what parameters the function takes.
Week 3: Object Oriented Programming – Creating a Class
Introduction
This week we will write a lot more code from scratch as we try to build an interactive application that can draw multiple buttons. Next week we will use these buttons for the control of sound, being able to record and play back sound samples using buttons we’ve created. We will learn about defining our own classes by creating a “.h” and “.cpp” file. By the end of the class, we will aim to play with vectors, but will have more time to expand on these concepts in the next class.
Be sure to place these images in your “data” folder: button-images.zip. Here is also a zip file of the code reproduced below: week2.zip. Your homework is to study “for loops“, “arrays“, and “vectors“, in order to reduce the code in the testApp.cpp file. If you are feeling more ambitious, try and make each button do something, such as play a sound (hint: ofSoundPlayer, and also be sure to check the openFrameworks examples on audio input and output!). We’ll look at how to do these together next week, as well as play with audio input and use a lot more for loops.
Button Pads
testApp.h
/*
 *  Created by Parag K. Mital - http://pkmital.com
 *  Contact: parag@pkmital.com
 *
 *  Copyright 2011 Parag K. Mital. All rights reserved.
 *
 *   Permission is hereby granted, free of charge, to any person
 *   obtaining a copy of this software and associated documentation
 *   files (the "Software"), to deal in the Software without
 *   restriction, including without limitation the rights to use,
 *   copy, modify, merge, publish, distribute, sublicense, and/or sell
 *   copies of the Software, and to permit persons to whom the
 *   Software is furnished to do so, subject to the following
 *   conditions:
 *
 *   The above copyright notice and this permission notice shall be
 *   included in all copies or substantial portions of the Software.
 *
 *   THE SOFTWARE IS PROVIDED "AS IS", WITHOUT WARRANTY OF ANY KIND,
 *   EXPRESS OR IMPLIED, INCLUDING BUT NOT LIMITED TO THE WARRANTIES
 *   OF MERCHANTABILITY, FITNESS FOR A PARTICULAR PURPOSE AND
 *   NONINFRINGEMENT. IN NO EVENT SHALL THE AUTHORS OR COPYRIGHT
 *   HOLDERS BE LIABLE FOR ANY CLAIM, DAMAGES OR OTHER LIABILITY,
 *   WHETHER IN AN ACTION OF CONTRACT, TORT OR OTHERWISE, ARISING
 *   FROM, OUT OF OR IN CONNECTION WITH THE SOFTWARE OR THE USE OR
 *   OTHER DEALINGS IN THE SOFTWARE.
 */

#pragma once

#include "ofMain.h"
#include "padButton.h"

// these are macros, which we treat as constant variables
#define WIDTH 480
#define HEIGHT 320

class testApp : public ofBaseApp{

    public:

    // initialization
        void setup();

    // main loop of update/draw/update/draw/update/draw...
        void update();
        void draw();

    // mouse/keyboard callbacks
        void keyPressed  (int key);
        void keyReleased(int key);
        void mouseMoved(int x, int y );
        void mouseDragged(int x, int y, int button);
        void mousePressed(int x, int y, int button);
        void mouseReleased(int x, int y, int button);

    // window callbacks
        void windowResized(int w, int h);
        void dragEvent(ofDragInfo dragInfo);
        void gotMessage(ofMessage msg);


    // for scaling our app for iphone/ipad
    float scaleX, scaleY;

    // single instance of our padButton class
    // padButton button1;

    // a vector is a c-standard library implementation of an array
    // this allows us to create multiple buttons
    vector<padButton> buttons;


};
testApp.cpp
/*
 *  Created by Parag K. Mital - http://pkmital.com
 *  Contact: parag@pkmital.com
 *
 *  Copyright 2011 Parag K. Mital. All rights reserved.
 *
 *   Permission is hereby granted, free of charge, to any person
 *   obtaining a copy of this software and associated documentation
 *   files (the "Software"), to deal in the Software without
 *   restriction, including without limitation the rights to use,
 *   copy, modify, merge, publish, distribute, sublicense, and/or sell
 *   copies of the Software, and to permit persons to whom the
 *   Software is furnished to do so, subject to the following
 *   conditions:
 *
 *   The above copyright notice and this permission notice shall be
 *   included in all copies or substantial portions of the Software.
 *
 *   THE SOFTWARE IS PROVIDED "AS IS", WITHOUT WARRANTY OF ANY KIND,
 *   EXPRESS OR IMPLIED, INCLUDING BUT NOT LIMITED TO THE WARRANTIES
 *   OF MERCHANTABILITY, FITNESS FOR A PARTICULAR PURPOSE AND
 *   NONINFRINGEMENT. IN NO EVENT SHALL THE AUTHORS OR COPYRIGHT
 *   HOLDERS BE LIABLE FOR ANY CLAIM, DAMAGES OR OTHER LIABILITY,
 *   WHETHER IN AN ACTION OF CONTRACT, TORT OR OTHERWISE, ARISING
 *   FROM, OUT OF OR IN CONNECTION WITH THE SOFTWARE OR THE USE OR
 *   OTHER DEALINGS IN THE SOFTWARE.
 */

#include "testApp.h"

//--------------------------------------------------------------
void testApp::setup(){
    ofSetWindowShape(WIDTH, HEIGHT);

    scaleX = WIDTH / 1024.0;
    scaleY = HEIGHT / 768.0;

    // we allow our vector to have 4 padButtons, which we index from 0 - 3
    buttons.resize(4);

    // the first index, we setup our button by calling the following methods
    buttons[0].setPosition(0, 0);
    buttons[0].setSize(200, 200);
    buttons[0].loadImages("button.png", "button-down.png");

    // and so on...
    buttons[1].setPosition(200, 0);
    buttons[1].setSize(200, 200);
    buttons[1].loadImages("button.png", "button-down.png");

    buttons[2].setPosition(400, 0);
    buttons[2].setSize(200, 200);
    buttons[2].loadImages("button.png", "button-down.png");

    buttons[3].setPosition(600, 0);
    buttons[3].setSize(200, 200);
    buttons[3].loadImages("button.png", "button-down.png");


    /*
    button1.setPosition(0, 0);
    button1.setSize(200, 200);
    button1.loadImages("button.png", "button-down.png");
    */

    //buttons.push_back(button1);

    /*
    button_image_up.loadImage("button.png");
    button_image_down.loadImage("button-down.png");
    button_x = 0;
    button_y = 0;
    button_width = 200;
    button_height = 200;
    button_state = NORMAL;
    */

}

//--------------------------------------------------------------
void testApp::update(){

}

//--------------------------------------------------------------
void testApp::draw(){
    // for scaling our whole canvas
    ofScale(scaleX, scaleY);

    // let's draw all of our buttons
    buttons[0].draw();
    buttons[1].draw();
    buttons[2].draw();
    buttons[3].draw();

    //button1.draw();

    /*
    // allow alpha transparency
    ofEnableAlphaBlending();

    if(button_state == NORMAL)
    {
        button_image_up.draw(button_x,
                             button_y,
                             button_width,
                             button_height);
    }
    else
    {
        button_image_down.draw(button_x,
                               button_y);
    }

    // ok done w/ alpha blending
    ofDisableAlphaBlending();
    */

}

//--------------------------------------------------------------
void testApp::keyPressed(int key){

}

//--------------------------------------------------------------
void testApp::keyReleased(int key){

}

//--------------------------------------------------------------
void testApp::mouseMoved(int x, int y ){

}

//--------------------------------------------------------------
void testApp::mouseDragged(int x, int y, int button){

}

//--------------------------------------------------------------
void testApp::mousePressed(int x, int y, int button){
    /*
    if( x > button_x && y > button_y
       && x < (button_x + button_width)
       && y < (button_y + button_height) )
       {
           button_state = BUTTON_DOWN;
       }
     */

    // and interaction callbacks, which we must scale for different devices
    buttons[0].pressed(x / scaleX, y / scaleY);
    buttons[1].pressed(x / scaleX, y / scaleY);
    buttons[2].pressed(x / scaleX, y / scaleY);
    buttons[3].pressed(x / scaleX, y / scaleY);
    //button1.pressed(x / scaleX, y / scaleY);
}

//--------------------------------------------------------------
void testApp::mouseReleased(int x, int y, int button){
/*
    button_state = NORMAL;
 */
    // and interaction callbacks, which we must scale for different devices
    buttons[0].released(x / scaleX, y / scaleY);
    buttons[1].released(x / scaleX, y / scaleY);
    buttons[2].released(x / scaleX, y / scaleY);
    buttons[3].released(x / scaleX, y / scaleY);
    //button1.released(x / scaleX, y / scaleY);
}

//--------------------------------------------------------------
void testApp::windowResized(int w, int h){

}

//--------------------------------------------------------------
void testApp::gotMessage(ofMessage msg){

}

//--------------------------------------------------------------
void testApp::dragEvent(ofDragInfo dragInfo){

}
padButton.h
/*
 *  Created by Parag K. Mital - http://pkmital.com
 *  Contact: parag@pkmital.com
 *
 *  Copyright 2011 Parag K. Mital. All rights reserved.
 *
 *   Permission is hereby granted, free of charge, to any person
 *   obtaining a copy of this software and associated documentation
 *   files (the "Software"), to deal in the Software without
 *   restriction, including without limitation the rights to use,
 *   copy, modify, merge, publish, distribute, sublicense, and/or sell
 *   copies of the Software, and to permit persons to whom the
 *   Software is furnished to do so, subject to the following
 *   conditions:
 *
 *   The above copyright notice and this permission notice shall be
 *   included in all copies or substantial portions of the Software.
 *
 *   THE SOFTWARE IS PROVIDED "AS IS", WITHOUT WARRANTY OF ANY KIND,
 *   EXPRESS OR IMPLIED, INCLUDING BUT NOT LIMITED TO THE WARRANTIES
 *   OF MERCHANTABILITY, FITNESS FOR A PARTICULAR PURPOSE AND
 *   NONINFRINGEMENT. IN NO EVENT SHALL THE AUTHORS OR COPYRIGHT
 *   HOLDERS BE LIABLE FOR ANY CLAIM, DAMAGES OR OTHER LIABILITY,
 *   WHETHER IN AN ACTION OF CONTRACT, TORT OR OTHERWISE, ARISING
 *   FROM, OUT OF OR IN CONNECTION WITH THE SOFTWARE OR THE USE OR
 *   OTHER DEALINGS IN THE SOFTWARE.
 */

// include file only once
#pragma once

// include openframeworks
#include "ofMain.h"

// declare the padbutton class and methods
class padButton {
public:

    // enumerators allow us to assign more interesting names to values of an integer
    // we could use an integer to the same effect,
    // e.g. "int button_state = 0", when our button is down
    // and "int button_state = 1", when our button is normal,
    // but enumerators allow us to instead say
    // "BUTTON_STATE button_state = BUTTON_DOWN", when our button is down,
    // "BUTTON_STATE button_state = NORMAL", when our button is normal.
    enum BUTTON_STATE {
        BUTTON_DOWN,
        NORMAL
    };

    // default constructor - no parameters, no return type
    padButton();

    // methods which our button class will define
    // one for loading images for each of the button states
    void loadImages(string state_normal, string state_down);

    // setters, to set internal variables
    // the position
    void setPosition(int x, int y);
    // the size
    void setSize(int w, int h);

    // drawing the buttons
    void draw();

    // and interaction with the button
    void pressed(int x, int y);
    void released(int x, int y);

private:

    // images for drawing
    ofImage button_image_normal, button_image_down;

    // our position
    int button_x, button_y;

    // size
    int button_width, button_height;

    // and internal state of the button
    BUTTON_STATE button_state;
};
padButton.cpp
/*
 *  Created by Parag K. Mital - http://pkmital.com
 *  Contact: parag@pkmital.com
 *
 *  Copyright 2011 Parag K. Mital. All rights reserved.
 *
 *   Permission is hereby granted, free of charge, to any person
 *   obtaining a copy of this software and associated documentation
 *   files (the "Software"), to deal in the Software without
 *   restriction, including without limitation the rights to use,
 *   copy, modify, merge, publish, distribute, sublicense, and/or sell
 *   copies of the Software, and to permit persons to whom the
 *   Software is furnished to do so, subject to the following
 *   conditions:
 *
 *   The above copyright notice and this permission notice shall be
 *   included in all copies or substantial portions of the Software.
 *
 *   THE SOFTWARE IS PROVIDED "AS IS", WITHOUT WARRANTY OF ANY KIND,
 *   EXPRESS OR IMPLIED, INCLUDING BUT NOT LIMITED TO THE WARRANTIES
 *   OF MERCHANTABILITY, FITNESS FOR A PARTICULAR PURPOSE AND
 *   NONINFRINGEMENT. IN NO EVENT SHALL THE AUTHORS OR COPYRIGHT
 *   HOLDERS BE LIABLE FOR ANY CLAIM, DAMAGES OR OTHER LIABILITY,
 *   WHETHER IN AN ACTION OF CONTRACT, TORT OR OTHERWISE, ARISING
 *   FROM, OUT OF OR IN CONNECTION WITH THE SOFTWARE OR THE USE OR
 *   OTHER DEALINGS IN THE SOFTWARE.
 */

#include <iostream>
#include "padButton.h"

// default constructor definition
padButton::padButton()
{
    // by default, we have a very boring button
    button_x = 0;
    button_y = 0;
    button_width = 0;
    button_height = 0;
    button_state = NORMAL;
}

void padButton::loadImages(string state_normal, string state_down)
{
    // load the images for our buttons
    button_image_normal.loadImage(state_normal);
    button_image_down.loadImage(state_down);
}
void padButton::setPosition(int x, int y)
{
    // set our internal variables
    button_x = x;
    button_y = y;
}
void padButton::setSize(int w, int h)
{
    // set our internal variables
    button_width = w;
    button_height = h;
}

void padButton::draw()
{
    // allow alpha transparency
    ofEnableAlphaBlending();

    // if our button is normal
    if(button_state == NORMAL)
    {
        // draw the normal button image
        button_image_normal.draw(button_x,
                                 button_y,
                                 button_width,
                                 button_height);
    }
    else
    {
        // draw the down image
        button_image_down.draw(button_x,
                               button_y);
    }

    // ok done w/ alpha blending
    ofDisableAlphaBlending();
}

void padButton::pressed(int x, int y)
{
    // compound boolean expressions to determine,
    // is our x,y input within the bounds of the button
    // we have to check the left, the top, the right, and the bottom sides
    // of the button, respectively.
    if( x > button_x && y > button_y
       && x < (button_x + button_width)
       && y < (button_y + button_height) )
    {
        button_state = BUTTON_DOWN;
    }
}

void padButton::released(int x, int y)
{
    // ok back to normal
    button_state = NORMAL;
}